Dawnwalker What Moves the Dead: Silas's House & Crake's Sword
Find Silas's house and hidden basement, follow the crypt route, rescue Crake, collect his missable sword and avoid wasting a time segment.
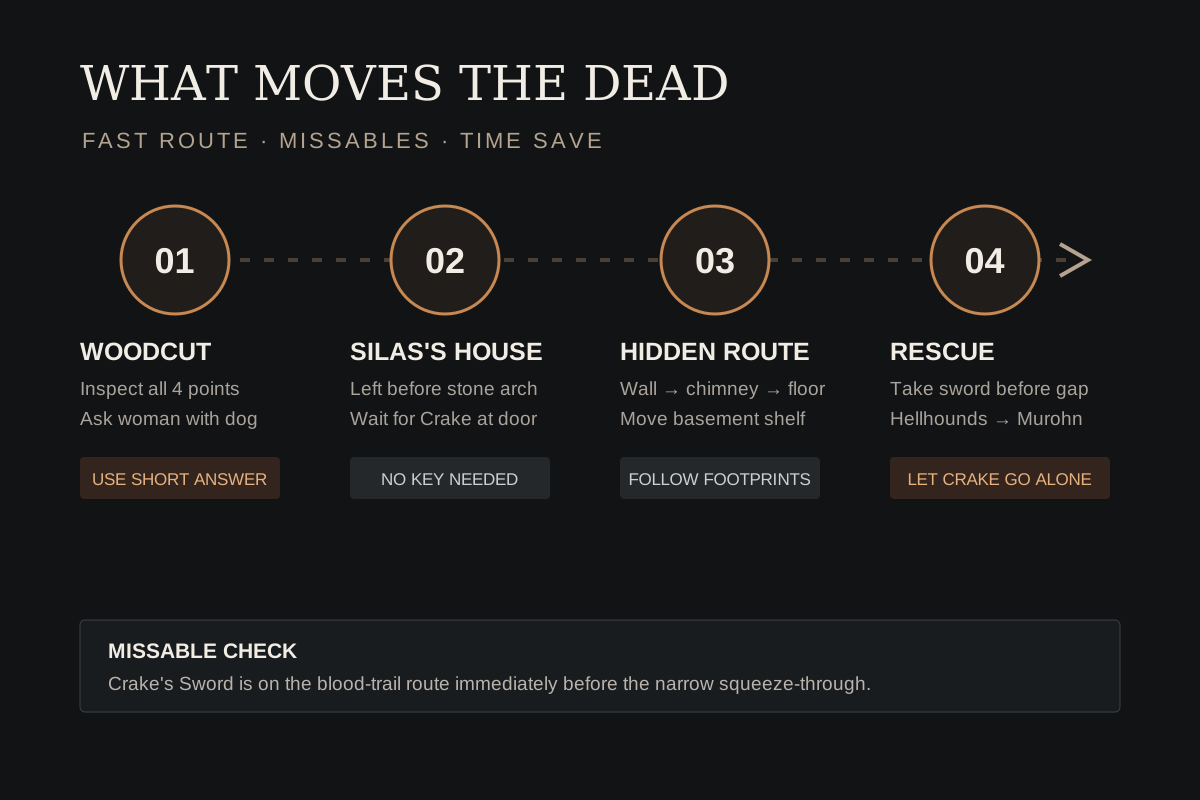
After What Hunts the Night, inspect all four points on Mevasser's woodcut, ask the seated woman with a dog about Silas, then enter the house just before the stone arch. Inspect the wall outline, chimney and floorboards; move the basement shelf to reach the ruins. During the rescue, follow the blood trail in Focus Mode and pick up Crake's Sword before squeezing through the wall. Let Crake return alone at the end to save one time segment.
Spoiler warning and fastest route
This walkthrough names the hidden route, late encounter and optional reward in What Moves the Dead, but avoids spoilers for the Manumit finale. The quest begins automatically after What Hunts the Night and normally takes four to six time segments depending on dialogue and whether Coen escorts Crake afterward.
The route below compresses the quest into four navigation checkpoints. Create a manual save before entering the underground ruins: Crake's Sword is easy to pass during the rescue, and the final escort choice can spend an extra segment.
| Checkpoint | Required action | Missable or time trap |
|---|---|---|
| Mevasser's print | Inspect all four marked areas | Leaving one hotspot unexamined blocks progress |
| Silas's house | Use the short answer, then enter the house before the stone arch | The long conversation costs a time segment |
| Hidden basement | Inspect the wall outline, chimney and floorboards; move the rear shelf | The front door is not a key puzzle—wait for Crake |
| Rescue and exit | Follow the blood, take Crake's Sword, beat the Murohn and leave upstairs | Escorting Crake home spends another segment |
Find Silas's house without wasting time
Follow Crake and Mevasser into the nearby building and examine all four interaction points on the woodcut. When the objective changes to asking about Silas, speak to the woman sitting with a dog toward the rear of the search area. Choose the short version if you are protecting the 30-day clock; she still gives the location.
Walk toward the stone arch. Silas's former house is on the left side of the street immediately before the arch. Its locked door does not need a key or alternate roof route. Stand near it briefly and Crake opens it.
- Inspect four points on the woodcut
- Ask the seated woman with the dog
- Choose the short explanation to avoid the optional segment
- Use the house on the left before the stone arch
- Wait at the locked door for Crake
Reveal the floor and basement passage
Inside the first room, inspect the square outline on the wall. In the adjoining room, inspect the chimney, then target the square floorboard section immediately to the chimney's right. A homeowner interrupts; the published routes agree that either paying or threatening lets the investigation continue, so choose by role-play rather than a unique-reward assumption.
Descend into the basement and inspect the shelf against the rear wall. Moving it exposes the passage into the underground ruins. From there the route is mostly linear: check the laboratory note, use Focus Mode on the footprints and continue into the crypt.
| If the objective is stuck | Check this interaction |
|---|---|
| Search inside the house | Square outline on the first-room wall |
| Examine the floor | Chimney first, then boards directly to its right |
| Search the basement | Shelf against the back wall |
| Search the laboratory | Note on the left counter, then footprints to the right |
Get Crake's Sword and rescue him
In the coffin room, inspect the body beside the lantern and take the nearby paper. When Crake is pulled away, turn back and activate Focus Mode to follow the blood trail. The weapon pickup lies on the ground just before Coen squeezes through the narrow break in the wall; collect it before entering the combat rooms.
Defeat the first hellhound group, then the mixed hellhound and Murohn encounter. The reliable approach is to remove the smaller enemies before committing to the Murohn so they cannot interrupt healing, blocking or a charged attack. After the fight, lead Crake through the marked door and keep climbing the stairs until the pair reaches the surface.
- Inspect the corpse beside the lantern
- Follow the blood trail back with Focus Mode
- Pick up Crake's Sword before the squeeze-through
- Clear hellhounds before focusing the Murohn
- Use the marked door and climb to the surface
Should you walk Crake back?
Let Crake return to the Manumit hideout alone if your priority is conserving time. Walking him back is a character-focused choice, but it spends an additional time segment. Current walkthrough evidence does not show that refusing the escort blocks the next Manumit quest or Crake's later romance route.
What Moves the Dead is followed by Who Pulls the Strings. Life Lock is associated with the next Silas-book objective, so do not assume the hex has been learned merely because this quest ended; open the next journal entry and follow its explicit learn-the-hex step.
| Final choice | Time effect | Confirmed progression effect |
|---|---|---|
| Let Crake return alone | No optional escort segment | Next Manumit step remains available |
| Walk Crake back | Consumes one segment | Extra companion time; no unique reward confirmed |
Rewards: confirmed versus disputed
Retail guides and extracted databases currently disagree on how to total the quest's staged XP and on whether Life Lock should be described as a reward here or in Who Pulls the Strings. The safe, reproducible rewards to track are the objective XP pop-ups and Crake's Sword if collected during the rescue.
Treat Life Lock as a follow-up acquisition: Who Pulls the Strings explicitly instructs Coen to obtain the hex from Silas's book and learn it. This distinction prevents a common false diagnosis where a player finishes What Moves the Dead, cannot see Life Lock yet and assumes the save is broken.
| Reward or unlock | Confidence | How to verify |
|---|---|---|
| Crake's Sword | Confirmed and missable | Pick it up before the narrow wall during the blood-trail rescue |
| Quest XP | Confirmed, total reported inconsistently | Check individual objective pop-ups rather than adding database alternatives |
| Who Pulls the Strings | Confirmed next quest | Return to the Manumit chain after leaving the ruins |
| Life Lock | Confirmed follow-up, not safe to promise at this quest end | Learn it from Silas's book when the next objective asks |
Frequently asked questions
Where is Silas's house in What Moves the Dead?
It is on the left side of the street immediately before the stone arch. Wait by the locked door and Crake opens it.
How do you open the hidden floor in Silas's house?
Inspect the square wall outline, then the chimney and the floorboards directly to the chimney's right. In the basement, move the shelf against the rear wall.
Where is Crake's Sword?
Follow the blood trail with Focus Mode after Crake is taken. The sword is on the ground just before the squeeze-through opening that leads to the hellhound and Murohn fights.
Should you walk Crake back to the hideout?
Let him return alone to save one time segment. Current walkthrough evidence does not show that this blocks the next Manumit quest or his later romance route.
Why did What Moves the Dead not give me Life Lock?
Life Lock is learned from Silas's book during the follow-up Who Pulls the Strings objective. Finishing What Moves the Dead alone is not the safest point at which to expect the learned hex.
Facts are linked to first-party publisher, developer, or storefront pages. Launch-watch details remain labeled until an official listing or reproducible retail-build test confirms them.